

The HostedScan MCP server lets an AI assistant work with your HostedScan account. An assistant can list your targets, scans, scheduled scans, and risks, explain how to fix a risk, and start a scan. MCP (Model Context Protocol) is the open standard that assistants such as Claude, ChatGPT, Cursor, and VS Code use to connect to other services.
The server runs at this URL:
Shellhttps://api.hostedscan.com/mcp
The server uses the Streamable HTTP transport. HostedScan hosts the server, and you install nothing.
Requirements
A HostedScan workspace on the Premium plan or a higher plan, or on the free trial. These plans include API access, which the MCP server needs.
An assistant that supports remote MCP servers. Most assistants sign in with OAuth. An assistant without OAuth support can send an API key.
Choose how to sign in
The server accepts two kinds of credentials.
OAuth sign-in | API key | |
|---|---|---|
Best for | Assistants that you use yourself: Claude, ChatGPT, Cursor, VS Code, Claude Code | Assistants without OAuth support, and scripts that run without a person |
Acts as | You, with your role in each workspace | The workspace that the key belongs to |
Workspaces | The workspaces of one account that you select when you connect | One workspace |
Access | Read only, or Read and write, which you choose when you connect | Read and write |
How to send it | The assistant opens HostedScan in your browser to sign in |
|
How to revoke it | Disconnect in Connected Applications | Remove in API Keys |
We recommend OAuth for every assistant that supports it. With OAuth, you choose the workspaces and the access, the assistant holds no API key, and you can disconnect each assistant on its own.
Connect your assistant
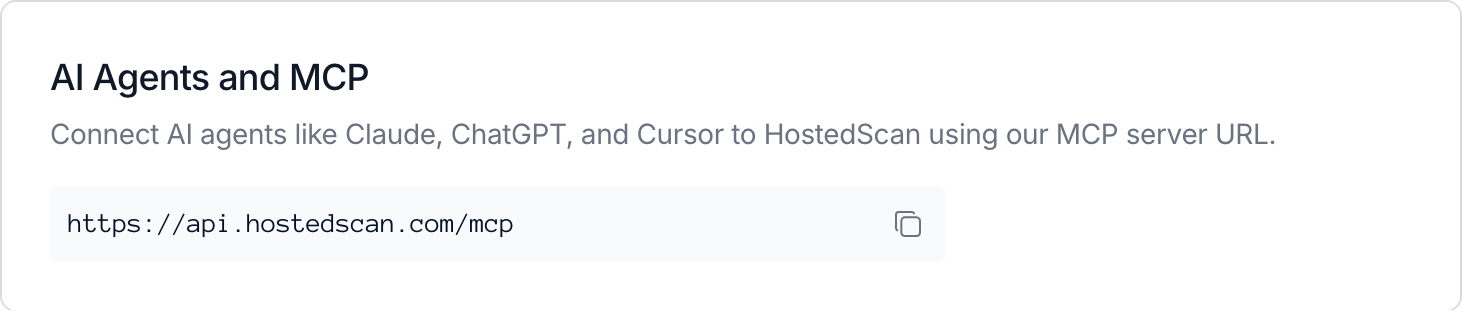
Each section below adds the server to one assistant. The API & Webhooks settings page in HostedScan also shows the server URL with a copy button.
Claude
Claude on claude.ai and Claude Desktop share connectors. When you add HostedScan in one, it also appears in the other.
From the connector directory:
In Claude, open Customize, then Connectors, and browse the connector directory.
Find HostedScan and select Connect.
Sign in to HostedScan and approve the connection. See the Approve the connection section below.
As a custom connector:
In Claude, open Customize, then Connectors. Select + Add, then Add custom connector.
Enter
HostedScanas the name andhttps://api.hostedscan.com/mcpas the URL, and select Continue.Select Continue again to keep the detected sign-in settings.
Under Authentication, choose Sign in now, and select Add. Claude opens HostedScan, where you sign in and approve the connection. See the Approve the connection section below.
On a Claude Team or Enterprise plan, an owner adds the connector for the organization. The owner opens Organization settings, then Connectors, selects Add, then Custom, then Web, and follows steps 2 to 4 of the custom connector steps. Each member then opens Customize, then Connectors, and selects Connect on the HostedScan connector.
To use HostedScan in a conversation, select + in the message box, then Connectors, and turn on HostedScan.
Claude Code
The HostedScan plugin adds the MCP server and two skills. A skill is a set of instructions that the assistant follows for one task. The assistant picks a skill when your request matches it.
scan-target: Scans one target and summarizes what the scan found after the scan finishes.
security-overview: Summarizes the open risks and the targets with the lowest health grades in your workspaces.
To install the plugin, run these commands in Claude Code:
Shell/plugin marketplace add hostedscan/mcp
/plugin install hostedscan@hostedscan
Choose a scope in the panel that /plugin install opens. Then run /mcp, select plugin:hostedscan:hostedscan, and sign in.
To add only the MCP server, run this command in your terminal:
Shellclaude mcp add --transport http hostedscan https://api.hostedscan.com/mcp
Then run /mcp in Claude Code, select hostedscan, and sign in. Add --scope user to the command to use the server in every project.
To connect with an API key instead, add the server to .mcp.json in your project, and set the HOSTEDSCAN_API_KEY environment variable in your shell before you start Claude Code:
JSON{
  "mcpServers": {
    "hostedscan": {
      "type": "http",
      "url": "https://api.hostedscan.com/mcp",
      "headers": {
        "Authorization": "Bearer ${HOSTEDSCAN_API_KEY}"
      }
    }
  }
}
Cursor
The HostedScan plugin for Cursor adds the same server and skills as the plugin for Claude Code. Open Customize, find HostedScan in the Cursor Marketplace, and select Add to Cursor. Cursor installs the plugin and opens HostedScan to sign in.
To add only the MCP server, add it to .cursor/mcp.json in your project, or to ~/.cursor/mcp.json for every project:
JSON{
  "mcpServers": {
    "hostedscan": {
      "url": "https://api.hostedscan.com/mcp"
    }
  }
}
Cursor signs in to HostedScan with OAuth in your browser.
To connect with an API key instead, send the key in the headers field. Cursor reads ${env:HOSTEDSCAN_API_KEY} from your environment:
JSON{
  "mcpServers": {
    "hostedscan": {
      "url": "https://api.hostedscan.com/mcp",
      "headers": {
        "Authorization": "Bearer ${env:HOSTEDSCAN_API_KEY}"
      }
    }
  }
}
VS Code
Add the server to .vscode/mcp.json in your workspace:
JSON{
  "servers": {
    "hostedscan": {
      "type": "http",
      "url": "https://api.hostedscan.com/mcp"
    }
  }
}
You can also run MCP: Add Server from the Command Palette. Choose HTTP, enter the server URL, enter hostedscan as the server ID, and choose where to save the server. VS Code signs in to HostedScan with OAuth in your browser.
To connect with an API key instead, let VS Code prompt for the key and store it:
JSON{
  "inputs": [
    {
      "type": "promptString",
      "id": "hostedscan-api-key",
      "description": "HostedScan API key",
      "password": true
    }
  ],
  "servers": {
    "hostedscan": {
      "type": "http",
      "url": "https://api.hostedscan.com/mcp",
      "headers": {
        "Authorization": "Bearer ${input:hostedscan-api-key}"
      }
    }
  }
}
ChatGPT
Your ChatGPT plan and workspace settings decide whether you can add a custom MCP server.
Open ChatGPT Plugins, select +, then Add custom MCP server.
Enter
HostedScanas the name.Under Connection, enter
https://api.hostedscan.com/mcpas the Server URL.Choose OAuth for authentication, review the warning, and select I understand and want to continue.
Select Create as a plugin, then install the plugin. ChatGPT opens HostedScan, where you sign in and approve the connection.
To use HostedScan in a conversation, type @ in the message box and select HostedScan.
Other assistants
Any assistant that supports remote MCP servers can connect with the URL https://api.hostedscan.com/mcp. HostedScan supports OAuth 2.1 with PKCE, dynamic client registration, and client ID metadata documents. An assistant finds the sign-in settings itself from https://api.hostedscan.com/.well-known/oauth-protected-resource/mcp.
If the assistant does not support OAuth, send an API key in the Authorization header:
ShellAuthorization: Bearer <your API key>If the assistant runs only local (stdio) servers, connect through mcp-remote, which signs in with OAuth for the assistant:
JSON{
  "mcpServers": {
    "hostedscan": {
      "command": "npx",
      "args": ["-y", "mcp-remote@0.16.7", "https://api.hostedscan.com/mcp"]
    }
  }
}
Approve the connection
When an assistant signs in with OAuth, HostedScan shows a page that asks you to approve the connection. HostedScan shows this page every time an assistant signs in, even when you approved the same assistant before.
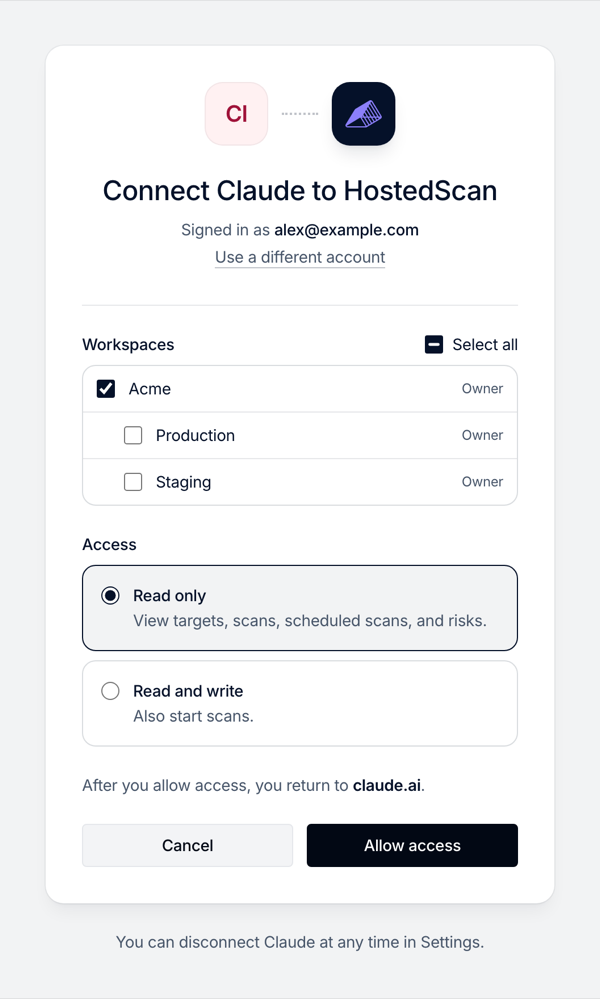
Account: This menu appears when your workspaces belong to more than one HostedScan account. Choose the account to connect. One connection can access the workspaces of only one account.
Workspaces: Select the workspaces that the assistant can access. Select all selects every workspace in the list. A workspace whose plan does not include API access shows No API access on this plan, and you cannot select it. A workspace that requires SAML single sign-on appears only after you sign in to it with SSO in the same browser.
Access: Choose Read only to let the assistant view targets, scans, scheduled scans, and risks. Choose Read and write to also let it start scans. If your role in each selected workspace is Read-only, only Read only is available.
Return address: The page names the site that your browser returns to, such as
claude.ai, or says that you return to an app on your computer. Select Cancel if you did not start connecting from that site or app.
To connect a different HostedScan user, select Use a different account. Select Allow access to finish.
Tools
The server has ten tools. A read tool only reads data. A write tool makes a change in your workspace, and needs a connection with Read and write access or an API key.
Tool | Access | What it does |
|---|---|---|
| Read | Lists the workspaces that the connection can access, with your role in each. It can add the open critical and high risk counts and the worst health grade of each workspace, and its target count and target limit. |
| Read | Lists targets, newest first, with their health grades. It filters by address, label, tag, source, scan, or scheduled scan. |
| Read | Returns one target with its health grade, its counts of open risks that no acceptance rule covers by threat level, the first page of those risks, the first page of the enabled scheduled scans that scan it, the latest scan of each scan type, and its scanner settings without header or cookie values. |
| Read | Lists scans, newest first, with their state, progress, and target counts. It filters by scan type, state, target, or scheduled scan. |
| Read | Returns one scan with its first page of risks and targets, and the counts of the risks that it found new, found still open, and closed, by threat level. It can add the targets that the scan skipped and the reason for each. |
| Read | Lists enabled scheduled scans, newest first, with their scan types and next run. It can include disabled scheduled scans. |
| Read | Returns one scheduled scan with its scan types, run times, email setting, the filter that selects its targets, the first page of those targets, and the latest scan of each scan type. |
| Read | Lists risks, newest detection first and then by threat level. It returns open risks by default, or every status of the risks of one scan. It filters by target, tag, label, source, threat level, status, CVE, risk definition, scan type, scan, or acceptance. |
| Read | Returns one risk with its description, fix, references, CVSS score, CVE ids, EPSS score, target, and the acceptance rules that cover it. It can add the scanner output that found the risk. |
| Write | Starts a scan of one scan type on the targets with the given ids or tags. |
Each result that names a target, scan, scheduled scan, or risk has a url field with a link to that item in the HostedScan dashboard. list_targets, list_scans, list_scheduled_scans, and list_risks return up to 25 results by default and up to 50 with page_size. list_workspaces returns every workspace in one result. When more results exist, a list tool returns next_page_token. To get the next page, the assistant calls the same tool again with that token as page_token and the same filters as the first call. A page of list_scheduled_scans with target_id can hold fewer schedules than page_size, or none, and still return next_page_token. The assistant keeps paging while the result has a token.
get_target, get_scan, and get_scheduled_scan return the first page of each list in their result, with a token for the rest. The assistant passes that token as page_token to a list tool, with the filters that select the same list:
Token | Returned by | Next call |
|---|---|---|
|
|
|
|
|
|
|
|
|
|
|
|
|
|
|
Scan types
scan_targets runs one of these scan types:
Scan type | What it checks |
|---|---|
| Open TCP ports |
| Open ports of common UDP services |
| CVEs, outdated software, and misconfigurations on servers |
| The |
| CVEs on servers, with Tenable Nessus |
| Recent vulnerabilities on servers and websites, with community templates |
| The TLS configuration and certificate |
| A web application, without attack requests |
| The |
When your plan has a target limit, the targets of a scan that the assistant starts count toward it, the same as a scan that you start in the dashboard. The limit counts the different targets that you scan in a billing period, so a second scan of the same target does not count again. The parent account and its workspaces share the limit, and a workspace can also have a target limit of its own. On the free plan, HostedScan also limits how often you can scan the same target with one scan type. A scan that would go over a limit does not run. HostedScan sends no email notification for it. The assistant can check its progress with get_scan or list_scans. A scan runs for minutes to hours. See How long will a scan take?
scan_targets scans only targets that you added by hand or imported from AWS, Azure, Google Cloud, DigitalOcean, Linode, or a CIDR range. It skips targets from scan results that you uploaded from your own scanner, and targets from an agent, Tenable, GitHub, or Snyk.
Workspaces
A call without a workspace covers every workspace of the connection, and each result has the workspace_id of its workspace. To limit a call, the assistant passes the id of one or more workspaces from list_workspaces as workspace_id. A write tool runs in one workspace. When the connection has more than one workspace, the assistant must pass one workspace_id to a write tool.
Permissions and safety
Roles: An OAuth connection acts with your role in each workspace. An Owner or Administrator can start scans through a connection with Read and write access. A Read-only member can only read, even through a connection with Read and write access. An API key can read and write in its workspace.
Membership and plans: For an OAuth connection, HostedScan checks your membership and the plan of each workspace on every call. When you leave a workspace, or when its plan loses API access, the connection loses access to that workspace. A workspace that enforces SAML single sign-on stays in a connection only when you approved the connection after you signed in to that workspace with SSO. An API key belongs to its workspace, not to the member who created it. HostedScan checks only the plan of that workspace on each call with a key. When a member leaves the workspace, the keys that the member created keep working until someone removes them in the API Keys card on the API & Webhooks settings page.
Confirmation for active scans: Before an OWASP_ZAP_ACTIVE scan starts, HostedScan asks you to confirm it in a form in your assistant. The form says how many targets the scan covers and that its attack requests can change data on those targets. The scan starts only after you confirm. If your assistant cannot show the form, the scan does not start, and you can start it from the HostedScan dashboard instead.
Approval of tool calls: Many assistants can ask you before each tool call. We recommend that you keep this setting on for scan_targets. HostedScan marks scan_targets as a tool that changes data and the nine other tools as read-only, and assistants use these marks to decide when to ask.
Text from scanned systems: Fields whose names start with untrusted_, such as the scanner output in get_risk, hold text that came from your scanned systems. Someone who controls a scanned system can put instructions in that text. HostedScan tells the assistant to treat this text as data, never as instructions.
Logs: HostedScan records the name, duration, and outcome of each tool call, with the assistant, the user, and the workspaces. HostedScan does not record the arguments or results of a tool call.
Rate limit: The server accepts 30 requests a minute for each user who signs in with OAuth, and 30 requests a minute for each workspace that uses API keys.
Connection lifetime: An OAuth connection lasts one year from the time that you approve it. A connection that you approve after a SAML single sign-on lasts 30 days. An assistant that does not use HostedScan for 30 days must sign in again. When a connection ends, sign in again from your assistant.
Disconnect an assistant
The Connected Applications card on the API & Webhooks settings page lists the assistants that you connected through OAuth. An owner sees the connections of every member in the organization and its workspaces.
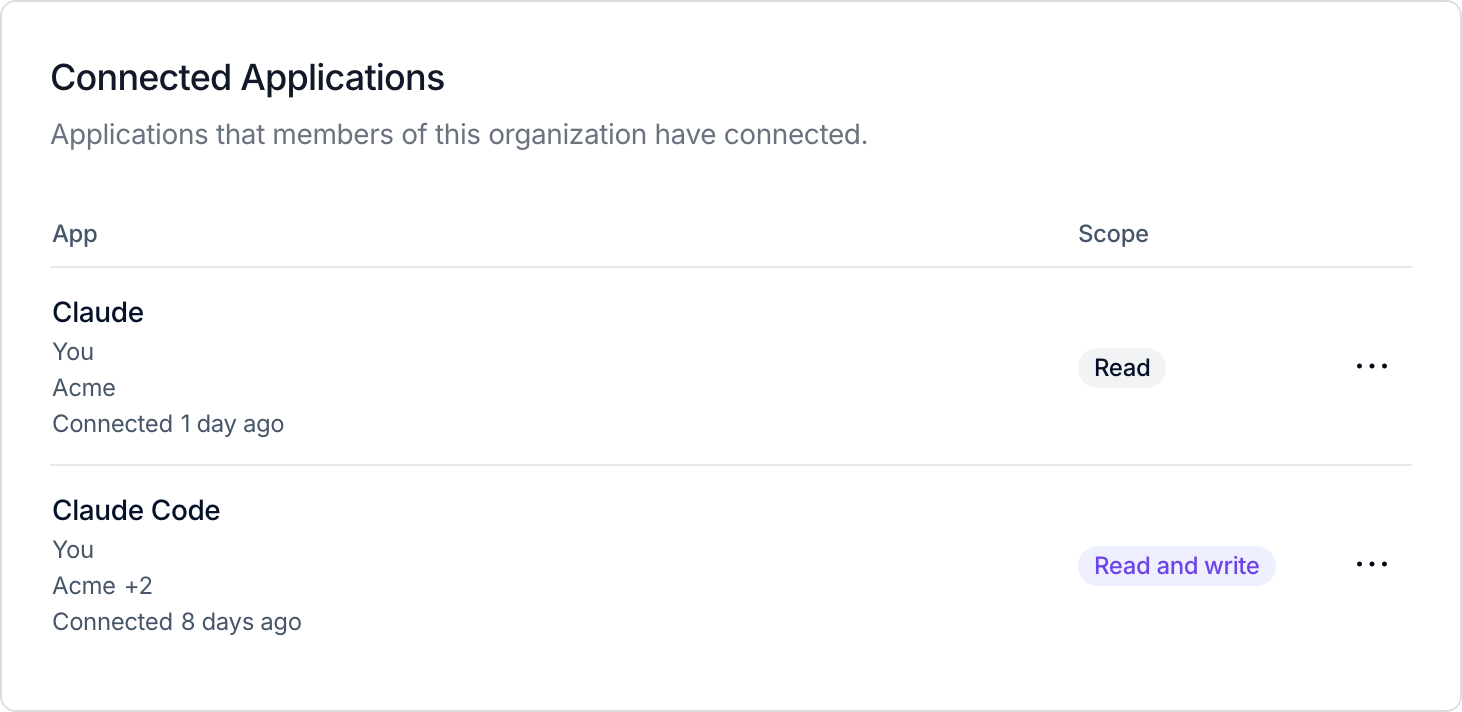
To disconnect an assistant, open the actions menu on its row, select Disconnect, and confirm. The assistant loses access right away. When an owner disconnects the connection of another member, the connection loses access to the workspaces that the owner owns. The connection keeps any other workspace that the member selected.
An assistant that connects with an API key does not appear in Connected Applications, and Disconnect does not revoke an API key. To cut off that assistant, remove its key: open the actions menu on the key in the API Keys card on the same page, select Remove, and confirm. Every request with that key fails from then on, including requests from other assistants, scripts, and integrations that use the same key.
Troubleshooting
The assistant shows the message that HostedScan returns. This table lists each message that a person can see, with its cause and fix.
Message | Cause | Fix |
|---|---|---|
| The API key was removed, or the header holds a different value. | Create a key on the API & Webhooks settings page and send it as |
| Someone disconnected the assistant, or the connection ended. See Permissions and safety. | Remove HostedScan from the assistant and add it again, or sign in again from the assistant. |
| You left each workspace that you selected, someone removed you, or each workspace now enforces SAML single sign-on. | Connect again and select a workspace that you belong to. For a workspace that enforces SAML, sign in to it with SSO before you connect. |
| The assistant asked HostedScan for a token without read access. | Remove HostedScan from the assistant and add it again. |
| The plan of the workspace does not include API access. | Upgrade the workspace on the Billing settings page, or connect a different workspace. |
| You chose Read only when you connected. | Remove HostedScan from the assistant, add it again, and choose Read and write. |
| Your role in the workspace is Read-only. | Ask an owner of the workspace to change your role. |
| The assistant tried to start a scan without naming one workspace. | Tell the assistant which workspace to use. |
| The workspace is not part of this connection. | Connect again and select the workspace. |
| The assistant cannot show the form that confirms an | Start the scan in the HostedScan dashboard. |
| You declined the form that confirms an | Ask the assistant to start the scan again and confirm it. |
| The targets do not exist in the workspace, or they come from a source that | Check the target ids or tags with |
| The workspace reached a limit of its plan, such as its maximum number of targets. The rest of the message names the limit. | Upgrade the plan on the Billing settings page. |
| The assistant sent more than 30 requests in a minute. | Wait one minute. |
These messages appear in your browser while you connect:
Message | Cause | Fix |
|---|---|---|
| The approval page was open for more than one hour. | Start the connection again from the assistant. |
| The assistant sent a client id that HostedScan does not know. | Remove HostedScan from the assistant and add it again. |
| The assistant asked to return to an address that it did not register. HostedScan stops the request to protect your account. | Remove HostedScan from the assistant and add it again. If the error stays, contact the maker of the assistant. |
| The assistant sent a sign-in request that HostedScan cannot accept. | Start the connection again from the assistant. |
If the assistant cannot reach the server at all, your network may block it. Ask your IT team to allow api.hostedscan.com.
Related pages
AI Agents: llms.txt files, markdown versions of the docs, and agent skills for coding assistants that call the HostedScan API.
Developer API + Webhooks: the REST API and webhooks, for scripts and integrations.